Tutorial 01
Install and buy
Shadowrocket is distributed only on the App Store. This tutorial covers how to recognize the official app, complete the purchase, and what the system asks the first time you open it. Nodes are imported in the next tutorial.
1. Confirm this is the app you mean to install
The store has other apps with similar names or icons. Check the three items below before you buy. If one is missing, do not pay.
- Open the App Store on iPhone or iPad and search
Shadowrocket. - The icon should be a line-drawn rocket on white, fading from blue to purple. Do not rely on the word “rocket” alone.
- Scroll to the middle of the product page. The developer must be Shadow Launch Technology Limited.
- You can also check the official store page in a browser: apps.apple.com/app/shadowrocket/id932747118.
2. How purchase works
This is a one-time purchase, not a monthly in-app subscription. Price follows your current App Store region. This site does not list a price.
- Tap Get or the price button, then confirm with Face ID, Touch ID, or a passcode.
- The purchase appears under Purchased for that Apple ID. Later, download it again with the same account on a new device. You do not buy it twice.
- If the current account finds nothing, this store region may not list the app. Use an Apple ID from a region that sells it, then return to this step.
- Do not install from an unofficial IPA, a configuration profile, or a third-party store. Those paths are outside this tutorial and cannot guarantee updates or permissions.
3. First launch
After install, open Shadowrocket from the Home Screen. An empty Home looks like this. Every later step starts here.
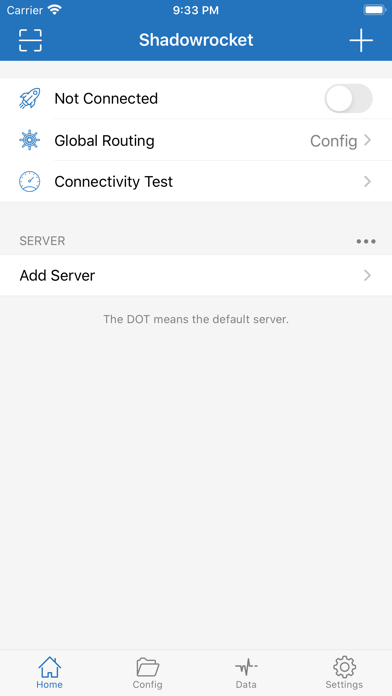
Learn these locations first. Later tutorials reuse them:
- Scan is at the top left. + at the top right adds a server or subscription.
- The switch to the right of Not Connected on the first row raises or drops the system tunnel.
- Global Routing shows the current mode. The screenshot is Config.
- Connectivity Test measures node latency. Use it after you connect.
- Four tabs at the bottom: Home, Config, Data, Settings. Daily work is mostly on Home.
If the app is not in English, only the labels change. The layout is the same.
4. Allow adding a VPN configuration
The first time you turn the switch on, or the first time the system asks, you will see a prompt like “Shadowrocket Would Like to Add VPN Configurations.” You must tap Allow, or the app cannot take over traffic.
- Follow the system prompt and confirm with Face ID, Touch ID, or the device passcode.
- After permission succeeds, check Settings → General → VPN & Device Management for a Shadowrocket entry.
- If you tapped Don’t Allow, go back to Home and turn the switch on again. The system usually asks again. If there is still no entry, delete that VPN configuration and reopen the app.